In this WireGuard VPN Setup Guide you will learn how to setup WireGuard VPN on Ubuntu/Debian step by step. Install WireGuard in Server and Client side in 10 minutes.
WireGuard is fast and modern VPN that utilizes state-of-the-art cryptography. It aims to be faster, simpler, leaner, and more useful than IPsec. It intends to be considerably more performant than OpenVPN. WireGuard is designed as a general purpose VPN for running on embedded interfaces and super computers alike, fit for many different circumstances.
Prerequisites
We will be using 2 Ubuntu 22.04 LTS machines. One as a server and the other as a client. You must have SSH access to the servers and sudo users.
Installing WireGuard
Let’s start!
To install WireGuard run next command on Server and Client (Peer):
# apt-get update
# apt-get install -y wireguard
WireGuard Generating a Key Pairs
We can generate Key Pairs – Private Key and Public Key. For this we use wg genkey and wg pubkey commands.
Run the following commands on the server or client:
# wg genkey > server_private.key
# wg pubkey < server_private.key | tee server_public.key

# wg genkey > client_private.key
# wg pubkey < client_private.key | tee client_public.key
Read data from new key files:
# cat client_private.key client_public.key server_private.key server_public.key
Example output:

Save Private and Public key values in notepad.

WireGuard Server Configuration
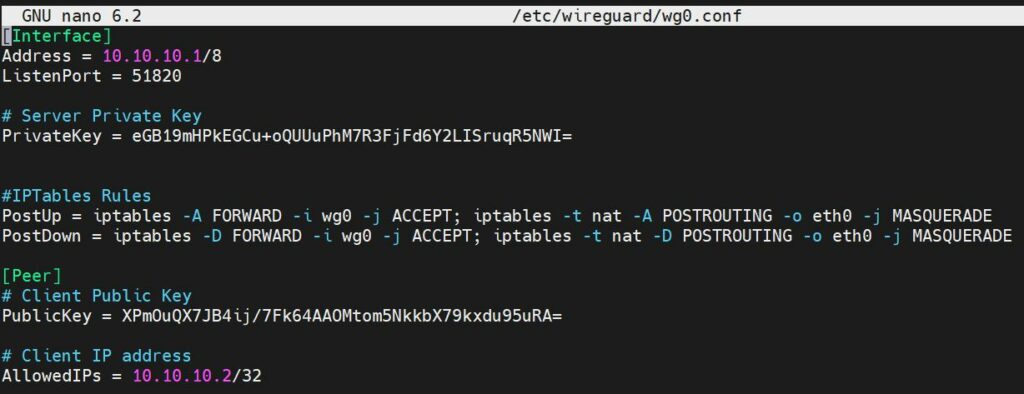
SSH to the VPN server create wg0.conf tunneling interface configuration file:
# nano /etc/wireguard/wg0.conf
Copy this example server configuration, into wg0.conf replace PrivateKey, PublicKey. Save and close.
NOTE: Replace the network interface name if have other than eth0.
[Interface]
Address = 10.10.10.1/8
ListenPort = 51820

# Server Private Key
PrivateKey = Your_Server_Private_Key


#IPTables Rules
PostUp = iptables -A FORWARD -i wg0 -j ACCEPT; iptables -t nat -A POSTROUTING -o eth0 -j MASQUERADE
PostDown = iptables -D FORWARD -i wg0 -j ACCEPT; iptables -t nat -D POSTROUTING -o eth0 -j MASQUERADE

[Peer]
# Client Public Key
PublicKey = Client_Public_Key

# Client IP address
AllowedIPs = 10.10.10.2/32

Open port 51820 on firewall:
Start WireGuard Server
Start and Enable WireGuard service on boot time:
# systemctl start wg-quick@wg0
# systemctl enable wg-quick@wg0
Also to bring UP or DOWN you can use commands:
# wg-quick up wg0
# wg-quick down wg0
Configuring a WireGuard Client (Peer)
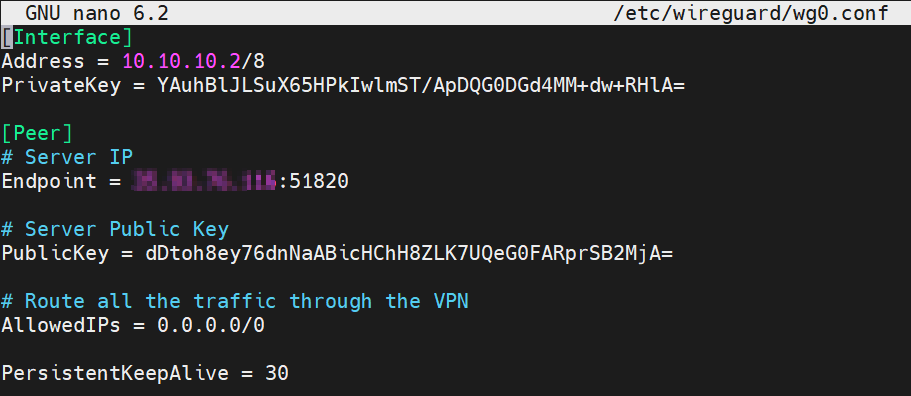
SSH to the client machine and create wg0.conf configuration file:
# nano /etc/wireguard/wg0.conf
Copy this example server configuration, into wg0.conf edit PrivateKey, EndpointPublicKey, Endpoint and save.
[Interface]
Address = 10.10.10.2/8
PrivateKey = Client Private Key

[Peer]
# VPN Server IP
Endpoint = VPN_SERVER_IP:51820

# Server Public Key
PublicKey = Server Public Key

# Route all the traffic through the VPN
AllowedIPs = 0.0.0.0/0

PersistentKeepAlive = 30

And start and Enable WireGuard service:
# systemctl start wg-quick@wg0
# systemctl enable wg-quick@wg0
Check Client Connection Status
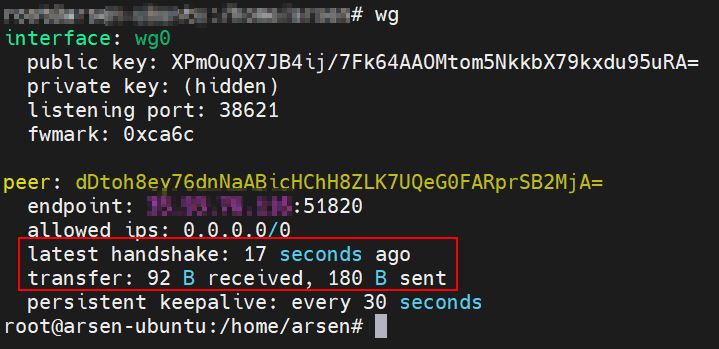
To check WireGuard client connection to VPN server run command: wg.
On example output we can see client already connected to the server.

Enable IP Forwarding on the Server
In final step we need enable IP forwarding on the WireGuard VPN server.
Check IP forwarding status:
# cat /proc/sys/net/ipv4/ip_forward
If returning 0 we need enable it.
# sysctl -w net.ipv4.ip_forward=1
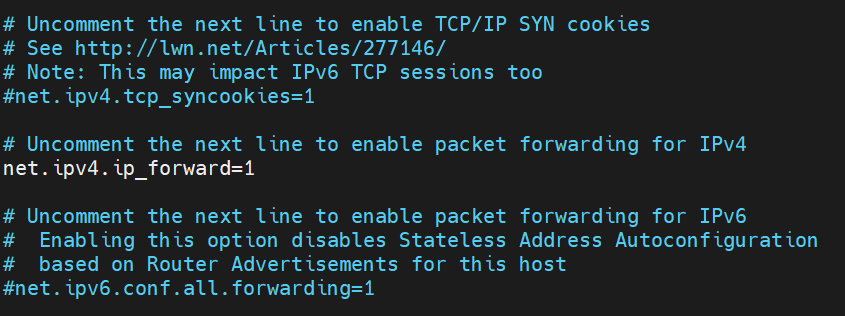
To make IP forwarding permanent edit /etc/sysctl.conf file.
Uncomment the line net.ipv4.ip_forward=1 to enable packet forwarding for IPv4.

Test Connection
SSH to client and test connection to server using ping command:
# ping -c 3 10.10.10.1

It works!
Finally check from client your new public IP:
# curl ifconfig.me
Conclusion
In this WireGuard VPN Setup Guide you just learn how to install WireGuard on Ubuntu, enable IP forwarding and how to configure VPN tunnel to route the all Internet traffic through the WireGuard tunnel.
If you like what you are reading, please:
 Buy me a coffee
