Resize a VMWARE virtual disk, and Resize LVM


How to resize a VMWARE virtual disk, and Resize LVM (CentOS, Red Hat Linux)
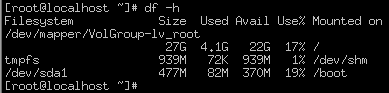
Check the partition table of the virtual disk in the guest
# fdisk -l /dev/sda

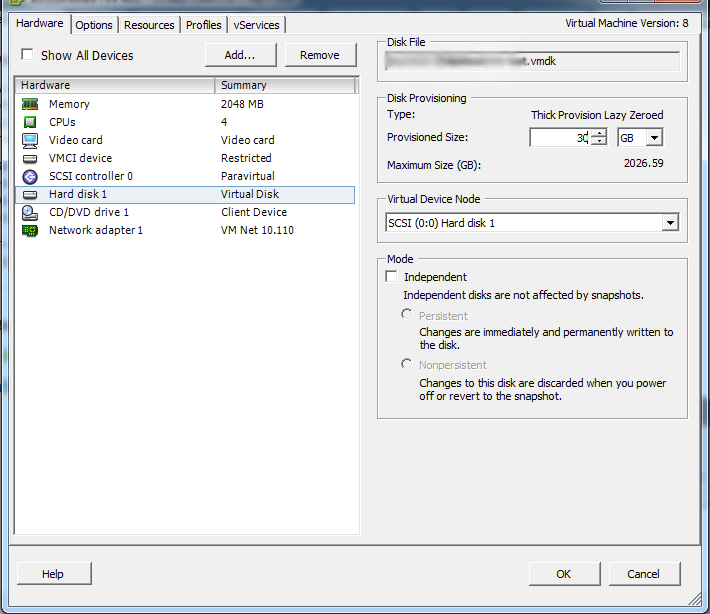
Firstly we need increase the size of the actual disk on the VMware virtual machine. Shutdown the guest OS and resize the virtual disk. This can be done by right clicking the virtual machine in vSphere, and “Editing settings”. Then selecting the hard disk and increase size. Sometimes you may not able to modify the size of the disk, if the size setting is greyed out. This can happen if the virtual machine has a snapshot. So you will need remove snapshots if you have.
Once disk size is increased we need boot guest OS and detect new disc space.
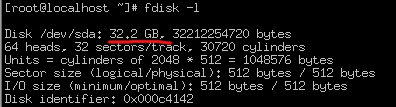
Disk size is increased from 25GB to 30GB.
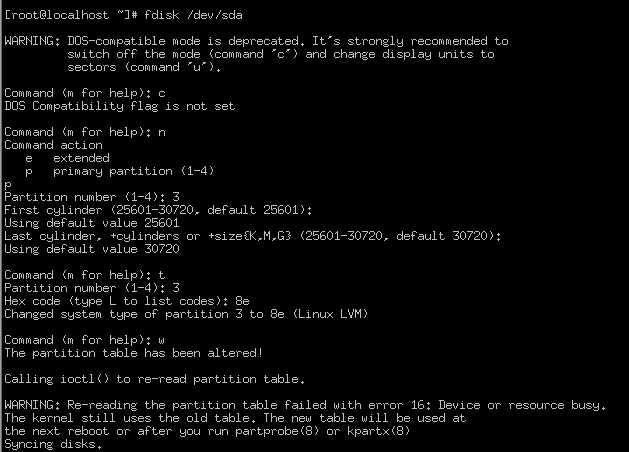
Now we need to create new primary partition to make use of the new expanded disk space.
fdisk /dev/sda
select ‘n’ for adding new partition
WARNING: DOS-compatible mode is deprecated. It's strongly recommended to
         switch off the mode (command 'c') and change display units to
         sectors (command 'u').

Command (m for help): n
select ‘p’ for making primary partition
then select partition number (in my case 3)
select ‘t’ to change to a partition system ID
and enter ‘8e’ hex code vor Linux LVM
select ‘w’ save changes
Command (m for help): w
The partition table has been altered!

Calling ioctl() to re-read partition table.

WARNING: Re-reading the partition table failed with error 16: Device or resource busy.
The kernel still uses the old table. The new table will be used at
the next reboot or after you run partprobe(8) or kpartx(8)
Syncing disks.
Then reboot guest OS
You can check the partition table after the reboot if you like, make sure it looks like what you expect
Now, create a new physical volume from the new partition
[root@localhost ~]# pvcreate /dev/sda3
  Physical volume "/dev/sda3" successfully created
You to use vgdisplay to list and identify the volume groups you have.
 #vgdisplay
  --- Volume group ---
  VG Name               VolGroup
Then extend the our existing volume group ”VolGroup“
[root@localhost ~]# vgextend VolGroup /dev/sda3
  Volume group "VolGroup" successfully extended
Now is time for increase the logical volume.
Confirm the name of the logical volume:
[root@localhost ~]# lvdisplay
  --- Logical volume ---
  LV Path                /dev/VolGroup/lv_root
  LV Name                lv_root
  VG Name                VolGroup
Then extended using the lvextend command:
[root@localhost ~]# lvextend /dev/VolGroup/lv_root /dev/sda3
  Size of logical volume VolGroup/lv_root changed from 22.01 GiB (5634 extents) to 27.00 GiB (6913 extents).
  Logical volume lv_root successfully resized
And finally, resize the filesystem in the logical volume by using the resize2fs command:
 [root@localhost ~]# resize2fs /dev/VolGroup/lv_root
resize2fs 1.41.12 (17-May-2010)
Filesystem at /dev/VolGroup/lv_root is mounted on /; on-line resizing required
old desc_blocks = 2, new_desc_blocks = 2
Performing an on-line resize of /dev/VolGroup/lv_root to 7078912 (4k) blocks.
The filesystem on /dev/VolGroup/lv_root is now 7078912 blocks long.
That’s it!